I decided I needed a pair of fold-up ballet flats to keep in my bag. In summer, while wandering around any city, feet tend to swell pretty fast when wearing heels. So this would be the perfect solution as they are lightweight and don't require carrying a tote bag. After doing a little research, the pairs I found made specifically for this purpose were made out of vinyl, and didn't look like they would hold up very well on city streets. Then a light went off in my head, and I recalled years ago when I had a pair of Capezio Ballet Slippers that I used to keep in my car for driving when I wanted to give my tootsies a rest from heels. Yes, real ballet slippers can be worn out on the street. I personally would be leery of wearing them in the pouring rain, but other than that they hold up very well. They can even be resoled easily by your local cobbler and I'm considering seeing if mine can put some type of rubber sole so that they'd be more shock absorbing, have a little traction, and perhaps keep them in shape longer. So I found a black pair on Amazon (
here, super fast shipping which is free 2nd day if you have Amazon Prime) and promptly purchased them. Hint: if you have small feet, you can order girl's sizes and the price can be a little less. So don't be afraid to click on description's for girl's ballet slippers. They are the exact same style as adult versions with a sometimes slightly lower price, honest.

Once they arrived and I put them on, I thought they looked kind of boring. I thought I'd maybe add lace trimming (nope, way too girly) or some vintage trimming I had (not enough omph!) Then I recalled seeing a pair on an online shopping site (I don't recall where it was, the heat has me too lazy to google, sorry) that were studded. That mixture of demure with tough appealed to my sense of style. So I decided I would embellish my ballet slippers with studs.

I didn't take any pictures of the process as its easy peasey. Just figure out your design in advance, and then apply the studs. The only tools needed are some type of tailor's marking pencil or chalk (anything that won't leave a permanent mark), an awl or something similar for poking holes for the stud prongs, and needle-nose pliers. For figuring out the design I used a piece of cardboard to push the studs into so they wouldn't slide around.
Before you can apply the studs, you need to find the center of the area to be embellished. Real ballet slippers conform to your foot, so you will find the center of the shoe may not be positioned in the center of your foot therefore I suggest you try them on and stand in them, then mark off the center with the tailor's pencil or chalk.
When you decide where the studs will go, its easiest to make a hole (depending on the size of your studs -- don't make a huge hole if your studs have tiny prongs) with an awl. I don't suggest a leather punch as it will make too big of a hole even on the smallest setting. The prongs on my studs were fairly big so a small awl worked great. For the spikes I actually had to put the awl through a few times and turn it around as well as pull to the sides a bit to stretch it, as there are screws that go in the bottom and they need to fit through the leather and lining of the slippers.
I used the pliers as I went along to set each stud, but you can also wait until you have all the studs in place and then set them.
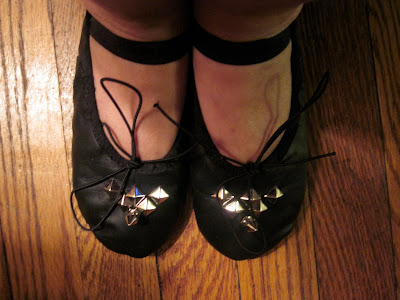

That's it! The last thing I did was find an old vintage Mary Quant makeup bag to store them in while they're in my handbag. The case will keep your handbag free of dirt from the soles, as well as keep them handy to find if your handbag is as much of a tangled mess as mine!

They came out so nice that I'm considering a pair of pink ones as well -- I can't resist ballet pink, and the addition of studs suits me perfectly!
Have you DIY'ed some ballet slippers? Plan on trying this? Let me know, I'd love to see what you came up with!
Cheers!


